In a nutshell
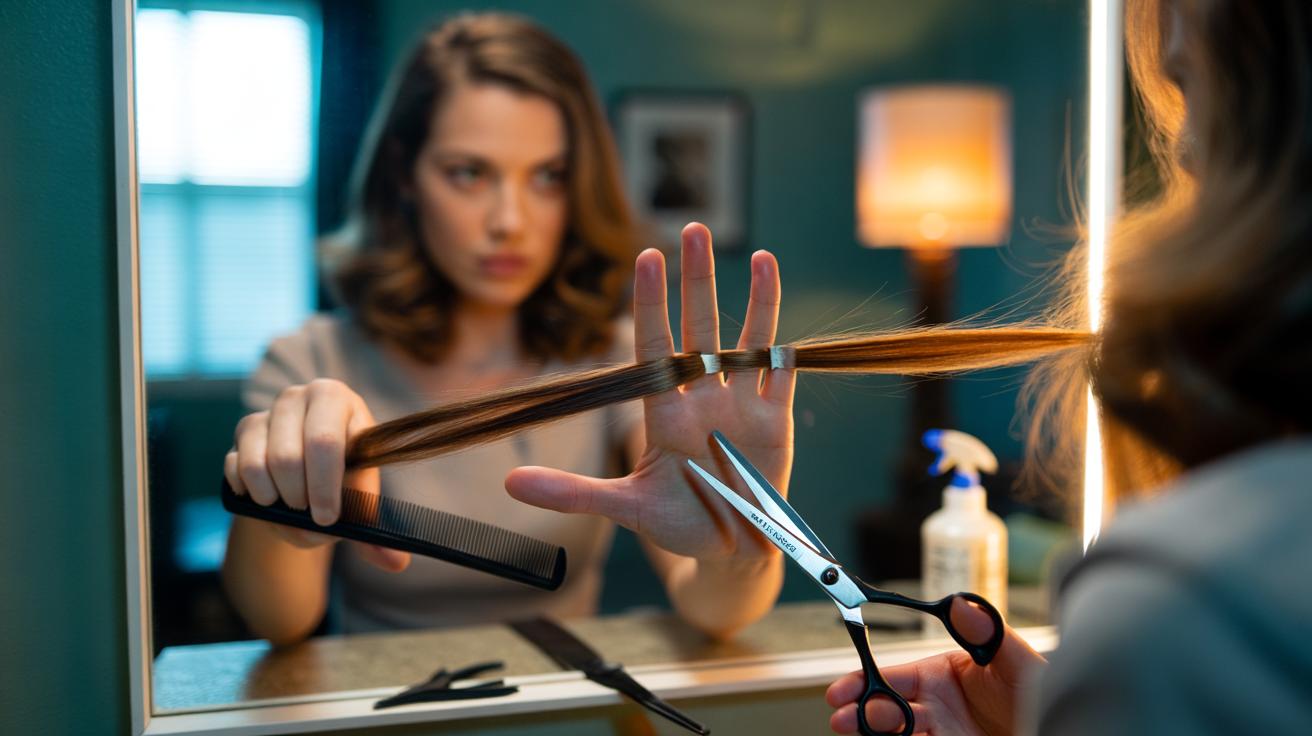
- ✂️ 3-finger section rule: keep sections no thicker than three fingers (~1.5–2 cm) to reveal the guideline and maintain even tension and elevation for smoothly blended layers.
- 🧰 Tools and setup: sharp cutting scissors, tail comb, sectioning clips, water spray, and two mirrors; work in good lighting, detangle thoroughly, part cleanly, and clip away unused hair for control and safety.
- 📐 Step-by-step: create a central guide, take equal three-finger vertical sections, elevate to 90°, match the guide, use light point-cutting, then cross-check horizontally and refine without carving new hard lines.
- 🔁 Face-framing and hair types: use diagonal-forward sections, manage over-direction to preserve or reduce front length; cut straight/wavy hair slightly damp and curls dry in pattern with three-finger groupings for uniform spring.
- ✅ Results and tips: consistent section size prevents crown gaps and jaw “shelves”; cut less than you think, re-section if the guide disappears, and keep notes so your next DIY trim is even more precise.
Budget-conscious and time-poor, many of us are cutting our own hair at home — yet the result doesn’t have to look second best. Stylists lean on predictable systems, and one of the most reliable is the 3-finger section rule, a quick way to size each slice of hair so layers fall evenly and move naturally. By keeping every subsection the same thickness, you keep control of tension, elevation and the all-important guideline. Consistency of section size is the hidden difference between a choppy DIY trim and a soft, salon-level shape. Here’s how the rule works, how to set up safely, and a step-by-step layering routine that respects your hair type and length.
What the 3-Finger Section Rule Actually Means
The 3-finger section rule is a pro shorthand: take sections no thicker than the width of three fingers pressed flat — usually about 1.5–2 cm depending on your hand. That width ensures you can see the guideline from the previous cut through the hair you’re about to trim, while maintaining even tension from root to tip. If your fingers are very slim or very broad, calibrate with a comb: mark out a consistent width and stick to it throughout the haircut. Use the same three fingers on the same hand every time to keep your “measuring tool” identical from start to finish.
Why it works: uniform section thickness gives predictable elevation, so layers blend rather than stack. Keep sections horizontal for soft, round layering or vertical for sleeker, face-framing lines. Around the crown, adhere strictly to the three-finger rule to avoid unintended gaps; at the perimeter, you can go slightly thinner to preserve weight. The rule is especially helpful on dense or wavy hair, where thicker grabs can hide your guide and create bulky, uneven panels.
Tools, Prep, and Safe Setup
Start with freshly washed, towel-dried hair; mist with water as you work to maintain even tension. Detangle thoroughly and create a clean centre parting. Gather the essentials within reach and position two mirrors so you can monitor the back of your head. Clip away hair you’re not cutting to prevent accidental snips. Good lighting and a non-slip floor matter just as much as sharp scissors. Avoid kitchen or craft shears; they crush the ends and invite frizz.
| Tool | Purpose |
|---|---|
| Cutting scissors (5.5–6 inch) | Crisp, clean lines with minimal fray |
| Tail comb | Precise partings and consistent three-finger width |
| Sectioning clips | Control and clean subsections |
| Water spray | Even moisture for reliable tension |
| Two mirrors | Back-of-head visibility and accuracy |
Stand straight, shoulders relaxed, and keep your elbows level to avoid accidental over-direction. Work slowly: cut less than you think, then recheck. For straight or wavy hair, trim slightly on the damp side; for curls, work dry in-natural pattern to preserve length. If you wear glasses, use them — clarity beats guesswork. If anything feels uncertain, stop, re-section using your three-finger measure, and reassess your guide.
Step-by-Step Layering with the 3-Finger Sections
Create your guide: from crown to nape, take a vertical slice exactly three-fingers thick. Elevate to 90 degrees from the head, comb smooth, and point-cut 0.5–1 cm from your target length to soften. This central guide determines the flow of the cut. Now work outwards on the back: take adjacent vertical sections, each the same three-finger width, elevate to meet the guide, and cut to match. Keep your comb teeth facing the same direction for consistent tension. Cross-check by laying horizontal sections across the same area; if you see peaks, refine with light point-cuts rather than chopping a new line.
Move to the sides. For face-framing, switch to slightly diagonal-forward sections still sized by three fingers. Decide on over-direction: pull hair back towards the ear to preserve front length, or forward to reduce weight near the jaw. Elevate consistently; inconsistent elevation creates steps. Soften ends with shallow point-cutting or slide-cut only on healthy hair. For curls, cut curl-by-curl within three-finger groupings to keep spring uniform. Finish by dusting the perimeter with tiny snips for polish. If your guide ever disappears, your section is too thick — reduce to your three-finger measure and recapture the line.
The three-finger section rule brings salon discipline to a home trim, turning guesswork into repeatable steps that protect shape, movement, and length. By standardising section size, tension, and elevation, you’ll avoid holes at the crown and heavy shelves at the jaw, even if you only take off a few millimetres. Keep notes on what worked — section direction, elevation angle, and how much you point-cut — so your next tidy-up is even sharper. Precision comes from consistency, not from taking off more hair. Ready to put three fingers to work and see how much smoother your at-home layers can look — and what small tweaks might make them uniquely yours next time?
Did you like it?4.5/5 (29)